


A Guide to Sterilisation von Instrumenten in Dentistry
In implant dentistry, clinical success depends on a chain of meticulously controlled events. While an advanced autoclave is a critical tool, its effectiveness is entirely dependent on the pre-cleaning process. Effective sterilisation von instrumenten is a multi-step protocol, and it begins with thorough decontamination long before an instrument enters the steriliser. The foundation of patient safety and predictable osseointegration is built during this critical first phase.
Building the Foundation of Patient Safety
True sterility is not a single event; it's the culmination of a rigorous, validated process. Saturated steam under pressure is a powerful sterilant, but it cannot penetrate organic debris like blood, tissue, or stubborn biofilms. When these residues remain on an instrument, they act as a physical shield for microorganisms, rendering the entire sterilisation cycle ineffective before it even begins.
The objective is to remove all traces of contamination, both visible and microscopic. This includes:
- Organic Material: Blood, saliva, tissue, and other fluids that can interfere with sterilant contact.
- Inorganic Residues: Mineral deposits and salts that can cause instrument corrosion and compromise function.
- Biofilms: Highly organised colonies of bacteria that adhere to surfaces and are notoriously resistant to both cleaning and sterilisation.
The clinical implications of failed sterilisation are severe. In Germany, healthcare-associated infections (HAIs) are a significant concern, with approximately one million cases annually and an estimated 40,000 resulting deaths. These statistics from the German Society for Hospital Hygiene serve as a stark reminder of why protocols for sterilisation von instrumenten must be flawless. You can delve deeper into these findings to understand their direct relevance to modern dental practices.
The Critical First Step: Decontamination
Decontamination must begin immediately after instrument use. As soon as bio-burden dries onto an instrument, it becomes exponentially more difficult to remove, dramatically increasing the risk of a failed sterilisation cycle.
Practitioner safety during this stage is paramount. Any team member handling contaminated instruments must wear full Personal Protective Equipment (PPE), including heavy-duty utility gloves (not examination gloves), protective eyewear, a mask, and a fluid-resistant gown.
The following workflow illustrates the essential, non-negotiable sequence of actions. Each step is equally important to the final outcome.
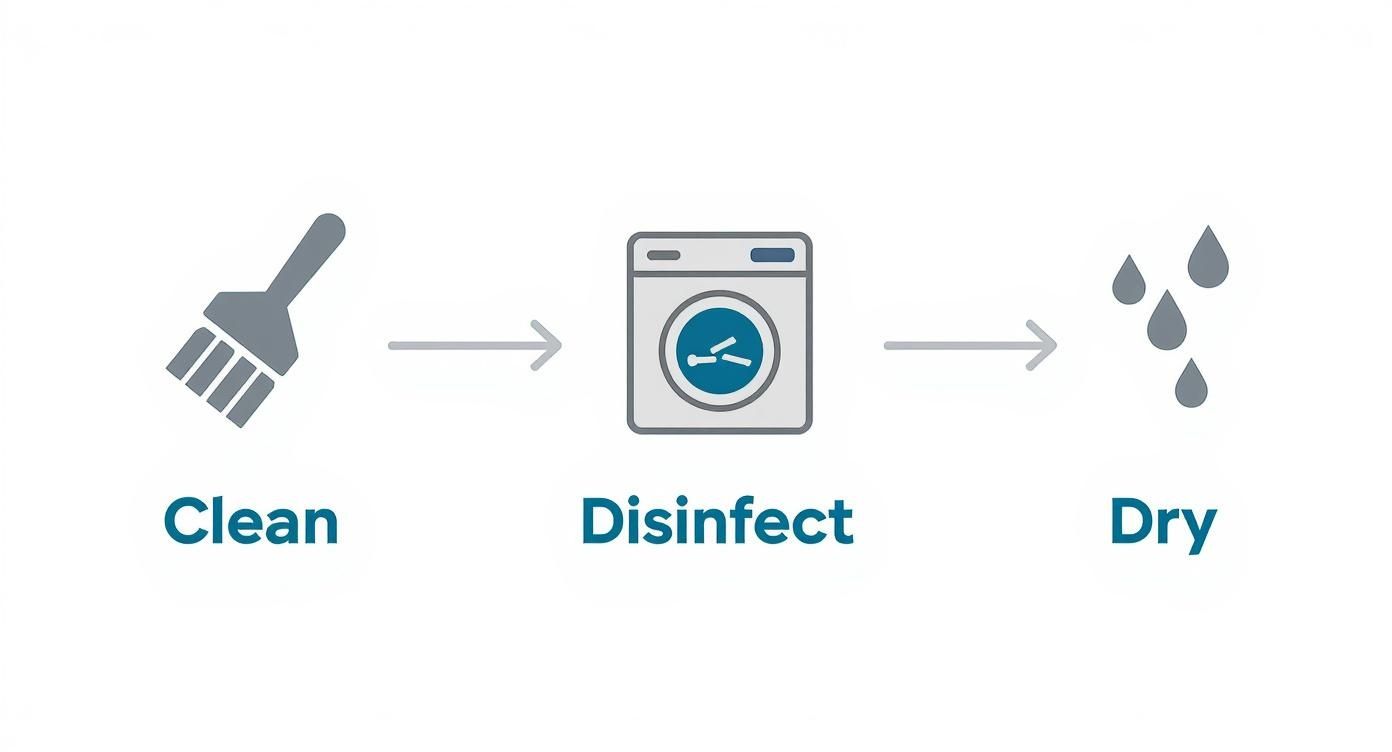
Cleaning, disinfecting, and drying—an error in one step compromises the entire process.
Manual Cleaning vs. Automated Systems
While manual scrubbing is an option, it is fraught with inconsistencies and significant risks. The process is highly dependent on operator technique, is labour-intensive, and exposes staff to a much higher risk of sharps injuries. Automated systems, such as ultrasonic cleaners and washer-disinfectors, offer a far more reliable, efficient, and safer methodology.
Ultrasonic cleaners use high-frequency sound waves to create microscopic bubbles that implode on instrument surfaces—a process known as cavitation. This powerful yet gentle action cleans intricate areas that a brush cannot effectively reach, such as the fine threads on an implant driver or the serrations on surgical forceps.
Clinical Insight: The use of an enzymatic detergent is critical for effective pre-cleaning. Unlike standard soaps, these detergents contain enzymes that actively break down proteins and lipids. This is essential for dissolving organic matter on complex surgical instruments, such as those found in an Alfa Gate implant kit.
Comparing the two methods clearly demonstrates the advantages of automation for a modern practice focused on safety and efficiency.
Manual Cleaning vs Automated Washing Comparison
| Parameter | Manual Cleaning | Automated Washer-Disinfector |
|---|---|---|
| Consistency | Highly variable; depends on staff skill and attention. | Standardised, validated cycles ensure repeatable results every time. |
| Effectiveness | Difficult to clean complex, hinged, or cannulated instruments thoroughly. | Superior cleaning action reaches all instrument surfaces, including internal channels. |
| Staff Safety | High risk of sharps injuries and exposure to contaminated aerosols. | Minimises handling of contaminated instruments, significantly reducing injury risk. |
| Efficiency | Labour-intensive and time-consuming process. | Frees up staff for other critical tasks; processes large batches efficiently. |
| Validation | Process is difficult to validate and document reliably. | Provides a documented, validated process for compliance and quality assurance. |
Washer-disinfectors represent the next level of automation. They provide a complete, validated cycle that cleans, rinses, thermally disinfects, and dries the instruments. This not only ensures a superior level of cleanliness but also standardises the entire process, removing human error as a variable. The thermal disinfection stage adds a crucial layer of safety for personnel handling the instruments prior to packaging.
A meticulously executed decontamination protocol is the bedrock of any successful sterilisation program. It is the first and most important step in protecting patients, staff, and the integrity of your clinical work.
How to Properly Inspect and Package Instruments
Once an instrument is clean and dry, it requires rigorous inspection. This step serves as the final quality control checkpoint before the instrument is sealed in a sterilisation pouch or wrap. A cursory glance is insufficient; this stage demands focused attention to detail.
Inspection should be performed under bright, glare-free illumination, ideally with magnification. The goal is to identify any factor that could compromise the instrument's function or the sterilisation process itself.
The Inspection Checklist
A systematic inspection protocol is essential for every instrument. Special attention must be paid to areas where bio-burden can easily hide.
- Residual Debris: Closely examine joints, hinges, serrations, and the micro-threads on screws or drivers. Any visible organic material indicates a cleaning failure, and the instrument must be re-processed.
- Corrosion and Pitting: Scan for any signs of rust, staining, or pitting. These imperfections create reservoirs for microorganisms, making effective sterilisation von instrumenten nearly impossible.
- Functional Integrity: Verify that all components move correctly. Check for dull scalers, worn forcep tips, or any evidence of bending or damage. A compromised instrument is a liability to both the patient and the clinician.
This is particularly critical for high-precision tools, like the drivers and drills found in Alfa Gate surgical instrument kits. A slightly worn driver head can damage an implant's connection, leading to significant clinical complications.
Choosing the Right Packaging
After an instrument passes inspection, it must be packaged. The packaging serves a dual purpose: it must allow the sterilising agent (e.g., steam) to penetrate, and then it must maintain sterility until the point of use.
For most dental practices, the primary options are pouches and wraps.
- Sterilisation Pouches: Ideal for single instruments or small groups of tools. The paper-plastic design allows for easy content identification. Both self-sealing and heat-sealed versions are available.
- Sterilisation Wraps: Used for larger surgical cassettes or trays. These non-woven materials are permeable to steam but form an effective barrier against microbes. Proper "envelope" or "square" folding technique is essential for creating a tortuous path that prevents contamination.
One of the most common errors is using packaging incompatible with the sterilisation method. For steam autoclaves, materials must withstand high temperatures and pressure. Always confirm manufacturer specifications.
Achieving a Perfect Seal and Proper Labelling
The integrity of the entire sterilisation process is nullified by a faulty seal. An imperfectly closed package creates an entry point for microorganisms post-sterilisation.
With self-sealing pouches, fold precisely on the perforated line and apply firm, even pressure to ensure a complete, airtight closure. Ensure no wrinkles or gaps exist in the adhesive strip.
Equally important is labelling. Every package must be labelled with essential tracking information before entering the autoclave. This is a non-negotiable component of modern quality assurance.
Essential Label Information:
- Steriliser ID: Identifies the specific autoclave used.
- Cycle or Load Number: For easy traceability.
- Date of Sterilisation: For shelf-life management.
- Operator Initials: Documents who ran the load.
This documentation enables any instrument to be traced back to its specific sterilisation cycle, which is invaluable for investigating post-operative complications and verifying protocol adherence.
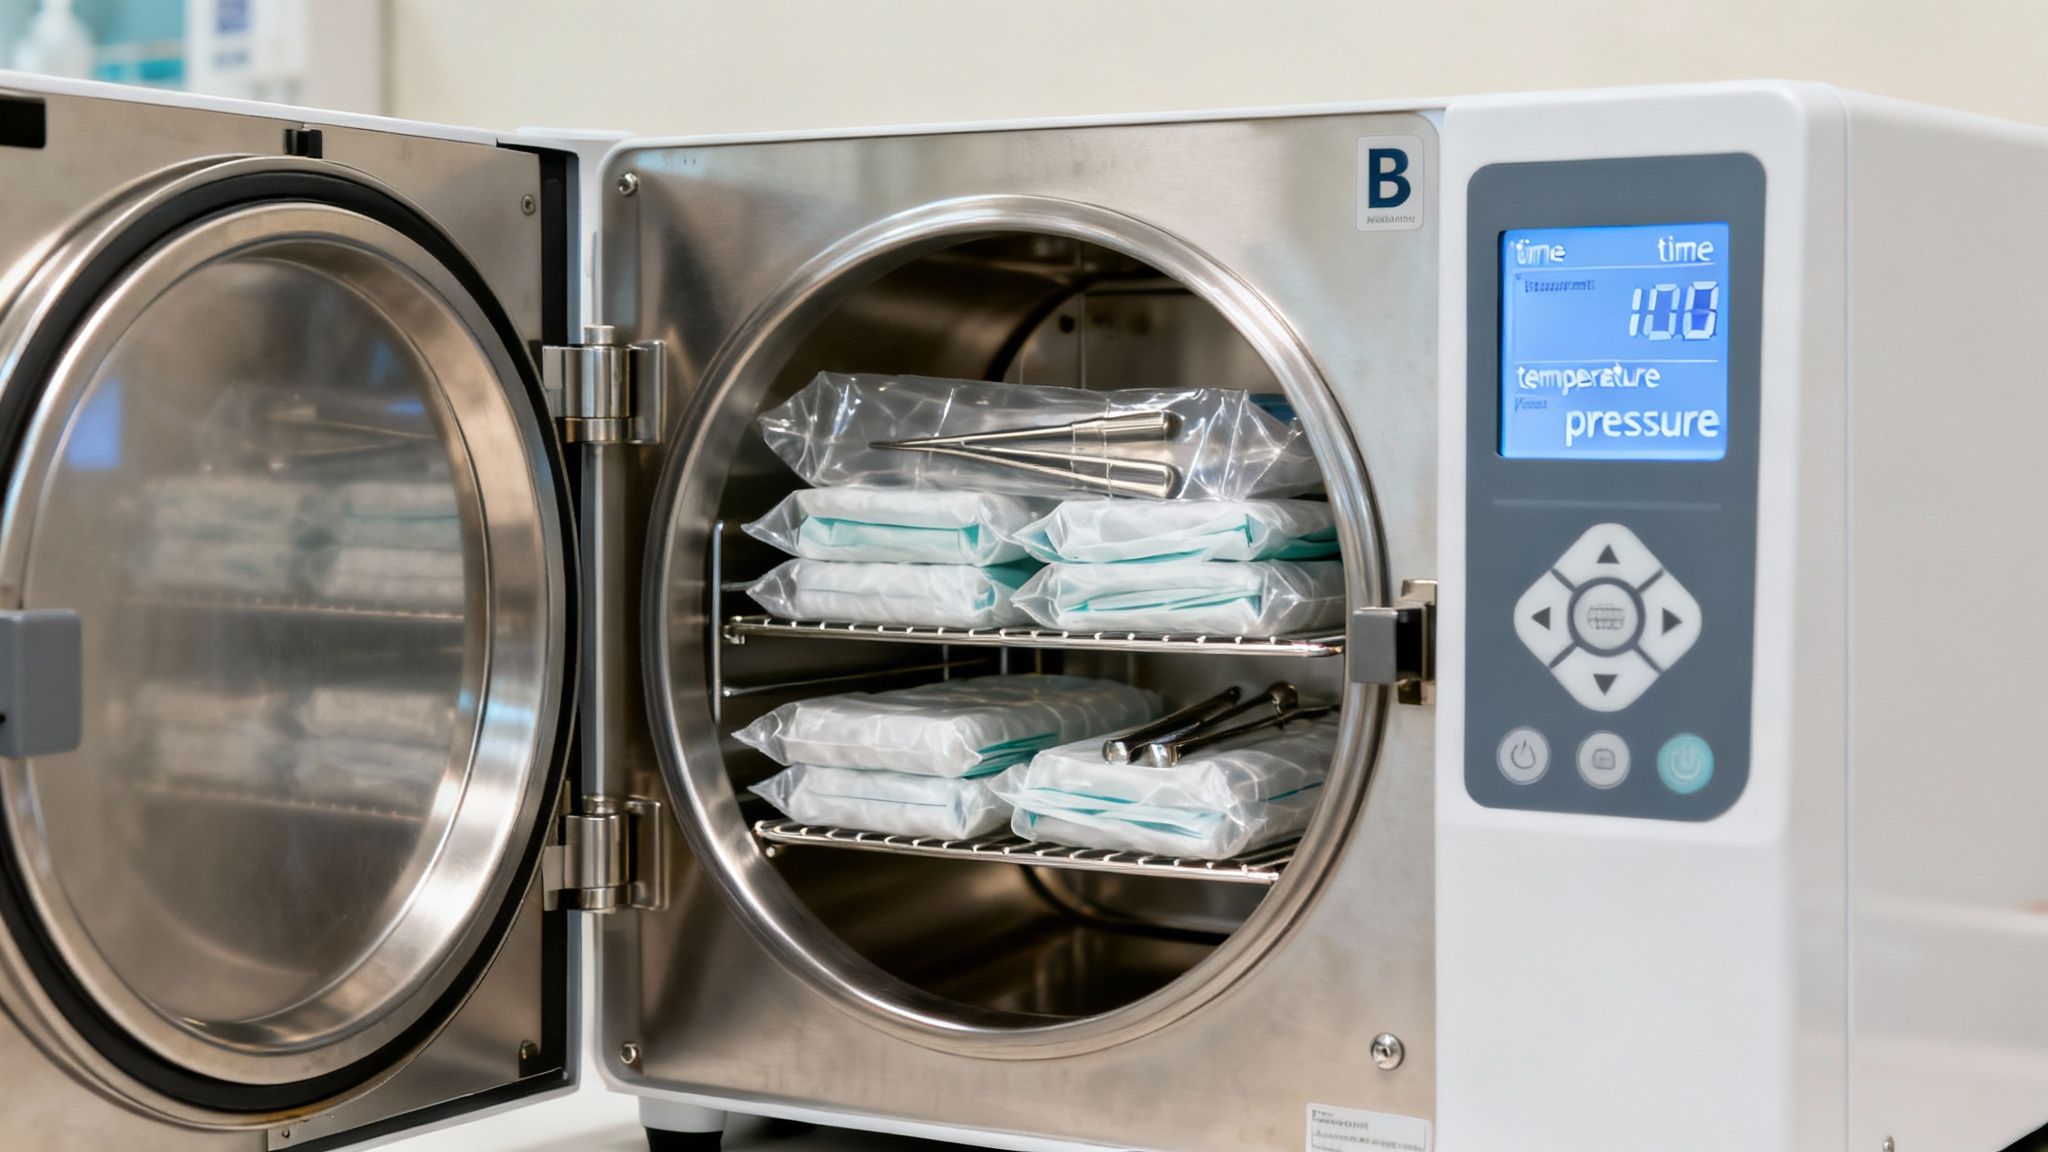
Mastering Your Autoclave and Sterilisation Cycles
The autoclave is the centerpiece of the instrument reprocessing workflow. For most dental applications, steam sterilisation remains the gold standard due to its reliability, efficiency, and cost-effectiveness. However, understanding the different types of autoclaves is crucial for ensuring a validated and effective process.
The scientific principle is simple: use saturated steam under pressure to achieve temperatures capable of killing all microorganisms, including highly resistant bacterial spores. The process is a precise balance of time, temperature, and pressure. Common cycles include 134°C for 3-4 minutes or 121°C for 15-20 minutes, but these are merely guidelines. Each cycle must be validated for the specific instruments being processed.
Why a Class B Autoclave Is Essential
In a modern dental practice, the distinction between Class N, Class S, and Class B autoclaves is significant. The difference lies in the method of air removal from the chamber prior to steam injection—a critical step that determines the success of the cycle.
- Class N: Relies on passive gravity displacement. Steam pushes the heavier, cold air down and out of the chamber. This system is inadequate for packaged, hollow, or complex instruments.
- Class S: An improvement, typically featuring a single pre-vacuum stage. It is more effective than Class N but may not be sufficient for intricate surgical instruments.
- Class B: This is the gold standard for any dental or surgical environment. It employs a powerful vacuum pump to actively remove air in several pulses before the sterilisation phase begins.
This active pre-vacuum air removal is why a Class B autoclave is non-negotiable for implant dentistry. It is the only method that guarantees complete steam penetration into the fine lumens of handpieces, the complex components of surgical instruments, and every item within a densely packed cassette, like the comprehensive Alfa Gate Guided Surgical Kit. Incomplete air removal leads to cold spots where sterilisation fails.
Beyond Steam: Exploring Low-Temperature Alternatives
While steam is dominant, it is not suitable for all materials. Many advanced dental instruments and devices are heat-sensitive and would be damaged or destroyed in an autoclave. This necessitates the use of low-temperature sterilisation methods.
These systems use chemical agents in gas or plasma form to achieve sterility without high heat. The most common methods include:
- Ethylene Oxide (EO): Highly effective with excellent penetration capabilities for complex devices with long, narrow lumens. However, it requires a lengthy aeration period to remove toxic residues.
- Vapourised Hydrogen Peroxide (VHP): A much faster alternative to EO, VHP is compatible with many plastics and electronics. It conveniently breaks down into water and oxygen but has slightly less penetrative power than EO.
- Peracetic Acid: Typically used in liquid chemical systems for immersible instruments like endoscopes, offering a rapid turnaround time.
The increasing adoption of these sophisticated methods reflects a clear industry trend. The German sterilisation equipment market was valued at approximately USD 319 million in 2023 and is projected to reach nearly USD 746.1 million by 2030. This growth is driven by the demand for low-temperature solutions for delicate medical devices. You can read more insights into the German sterilisation equipment market to understand these industry shifts.
The Principle of Cycle Validation
Validation is more than simply selecting a pre-set cycle. It is the documented procedure of obtaining, recording, and interpreting the results required to establish that a process will consistently yield a product complying with predetermined specifications. For sterilisation, this means proving the chosen cycle consistently achieves the required Sterility Assurance Level (SAL) of 10⁻⁶ for your specific instrument loads.
Clinical Insight: Validation confirms that your process—including your loading configurations, packaging types, and instrument sets—is effective with your selected cycle parameters. It provides the empirical evidence that your sterilisation is effective, repeatable, and compliant with regulatory standards.
A cycle validated for a few loose instruments is not necessarily effective for a densely packed surgical cassette. Each unique load configuration must be challenged with biological and chemical indicators placed in the most difficult-to-sterilise locations. True sterilisation von instrumenten is built upon this evidence-based foundation.
Making Sure It Worked: Monitoring and Maintenance
Effective sterilisation von instrumenten requires continuous verification. Proving that every sterilisation cycle was successful is a cornerstone of patient safety and quality assurance. It demands a multi-faceted approach to monitoring.
You cannot rely solely on the steriliser's "cycle complete" message. True assurance is achieved through a combination of physical, chemical, and biological monitoring, each providing a different piece of critical data.
The Three Pillars of Sterilisation Monitoring
A robust sterilisation protocol integrates all three monitoring types into a regular workflow. Each method answers a distinct and vital question about the cycle's performance.
-
Physical Monitoring: This is the first line of verification. It involves reviewing the autoclave's printout or digital log for every load to confirm that the critical parameters—time, temperature, and pressure—were achieved and maintained for the required duration. Any deviation is an immediate red flag.
-
Chemical Monitoring: These are the indicator strips and tapes used with every package. An external indicator merely shows that the package has been exposed to heat. The internal indicator is more critical, as it confirms that the sterilant (e.g., steam) penetrated the packaging and reached the instruments inside. A failed internal indicator means the contents are not sterile.
-
Biological Monitoring: This is the ultimate proof of efficacy. Biological indicators (BIs), or spore tests, contain highly resistant bacterial spores (Geobacillus stearothermophilus for steam). If your autoclave can kill these spores, you can be confident that it is killing all other microorganisms. This is the only method that directly tests the lethality of the sterilisation process.
Performing a weekly biological spore test is the non-negotiable standard for quality assurance in any modern dental practice.
A clear schedule is essential for ensuring consistency and compliance. It outlines what to check, how often, and the corrective actions for a failed test.
Sterilisation Monitoring Schedule for Dental Clinics
| Monitoring Type | Frequency | Purpose | Action if Failed |
|---|---|---|---|
| Physical | Every cycle | Verifies time, temperature, and pressure were met. | Do not use the load. Review machine settings and cycle parameters. Re-run or quarantine. |
| Chemical | Every package | Confirms sterilant exposure (external) and penetration (internal). | If the internal indicator fails, the package is not sterile. Repackage and re-sterilise. |
| Biological | At least weekly | Directly proves the machine's ability to kill highly resistant spores. | Take the steriliser out of service immediately. Review all records since the last passed test. Quarantine and recall instruments if necessary. |
This schedule provides a clear framework, translating complex requirements into simple, actionable steps for your team.
Routine Care Prevents Surprise Failures
Your autoclave requires regular maintenance to ensure consistent performance. Proactive care is far less disruptive than an unexpected breakdown that halts your entire clinical workflow.
A simple, consistent checklist is highly effective.
Daily Checks:
- Wipe the door gasket and chamber sealing surface to ensure a proper seal.
- Wipe the exterior and interior of the unit with a soft, damp cloth.
- Check and top up the water reservoir using only distilled or deionised water.
Weekly Tasks:
- Drain and clean the water reservoir to prevent biofilm formation.
- Remove and clean the chamber racks and trays.
- Run a cleaning cycle according to the manufacturer's instructions.
Periodic Maintenance:
- Inspect and clean all filters and drains as recommended.
- Schedule professional service and calibration annually or per the manufacturer's guidelines.
Practice Management Tip: View maintenance as an investment in clinical uptime. A non-functional steriliser can cancel a full day of surgical procedures, impacting both patient care and practice revenue. A few minutes of weekly checks ensures equipment readiness.
Maintaining Sterility Post-Processing
The process is not complete when the autoclave cycle ends. The final step is ensuring that every sterile package—whether containing basic instruments or components for an Alfa Gate implant system—remains sterile until it is opened at chairside.
The guiding principle is event-related sterility. This modern concept posits that a package's sterility is determined by handling and storage conditions, not an arbitrary expiration date. As long as a package remains clean, dry, and its integrity is uncompromised, its contents are considered sterile.
Store sterile packages in a dedicated, enclosed, low-traffic area. Protect them from moisture and physical damage. If a package is dropped, crushed, wet, or torn, it is considered contaminated and must be reprocessed. This strict discipline is essential for safeguarding the integrity of the entire sterilisation effort.
For clinicians and distributors seeking to align with a leader in dental innovation, we invite you to become a distributor and partner with Alfa Gate.
Making Documentation and Traceability Second Nature
Documentation is the final, critical link in the sterilisation chain. It serves as your legal and clinical proof that every step in the sterilisation von instrumenten protocol was executed correctly. A modern sterilisation log must be comprehensive and meticulously maintained.
For every cycle, the log must capture essential data: the steriliser identification, the cycle or load number, the processing date, the physical parameters achieved (time, temperature, pressure), and the initials of the operator.
Furthermore, the results of chemical and biological indicators must be recorded. This creates a transparent, defensible record demonstrating that each cycle performed effectively.
Building an Unbreakable Chain of Traceability
Beyond logging cycle data, true quality assurance is achieved through instrument traceability. This involves linking a specific instrument pack not only to its sterilisation cycle but also to an individual patient's record. This is especially critical in implant dentistry, where a post-operative infection can lead to implant failure.
Consider a scenario where a patient presents with a post-operative infection. With full traceability, you can instantly identify the specific surgical kit used, trace it to its sterilisation load, and review all associated data—from cycle parameters to indicator results. This allows for rapid investigation to confirm protocol adherence or identify a potential process failure.
The Big Picture: Traceability transforms documentation from a passive requirement into an active risk management tool. It provides undeniable evidence of your clinic's commitment to patient safety and is invaluable during audits or in the event of a clinical adverse event. You can learn more about building robust clinical workflows in our article on Digital Dentistry Trends.
Paper Logs vs. Digital Systems: What's Right for You?
Clinics typically use either traditional paper logs or modern digital systems for record-keeping. Both can be compliant, but they offer vastly different levels of efficiency and risk.
-
Paper-Based Systems: The primary advantage is simplicity and low initial cost. A logbook is easy to implement. However, paper records are susceptible to human error (e.g., illegible handwriting, missed entries), can be lost or damaged, and make data retrieval for audits a slow, manual process.
-
Digital Logging Systems: These systems represent a significant advancement. They often interface directly with modern autoclaves, automatically capturing cycle data and eliminating transcription errors. They provide a searchable database, making it effortless to track an instrument's history or generate compliance reports. While the initial investment and training are higher, the long-term benefits in efficiency, accuracy, and risk management are substantial.
The Ever-Changing World of Sterilisation
The field of sterile processing is continually evolving, driven by trends toward decentralised healthcare. A notable development in Germany is the rise of mobile sterile units, which provide on-site sterilisation services to outpatient clinics and smaller surgical centers. The market for these units was valued at approximately USD 19.1 million in 2025 and is projected to grow to USD 35.5 million by 2035. This trend underscores the industry's move toward more flexible and accessible hygiene solutions. You can discover more insights about mobile sterile unit trends to see where the industry is heading.
Ultimately, whether using a digital system or a paper logbook, the goal is the same. Your documentation must tell the complete and accurate story of an instrument’s journey. This transparent record is the ultimate proof of your practice's dedication to safety and clinical excellence.
If you have questions about integrating advanced implant systems into your documented clinical workflow, please contact our expert team.
Common Questions on Instrument Sterilisation
Even with robust protocols for the sterilisation von instrumenten, practical questions and challenging scenarios arise in a busy dental clinic. Addressing these common queries reinforces best practices and ensures your team operates with confidence based on evidence-based principles.
Navigating Failed Cycles and Monitoring Frequency
A common cause of a failed sterilisation cycle is improper instrument preparation. This often means instruments were inadequately cleaned, leaving residual organic debris that shields microorganisms from the sterilant.
Another frequent cause is overloading the autoclave. When packages are packed too tightly, steam circulation is impeded, creating cold spots where sterilisation cannot occur.
This highlights the importance of routine monitoring. According to all major infection control guidelines, biological monitoring with spore tests must be performed at least weekly. This is the only method that directly verifies the steriliser's ability to kill highly resistant bacterial spores.
A crucial tip: A spore test should also be run whenever a key variable changes. This includes after any steriliser repair, when training new personnel responsible for sterilisation, or when switching to a new type of packaging material.
Handling Single-Use Items and Storage
A frequent point of confusion is the distinction between single-use and reusable items. Can a single-use dental implant be re-sterilised? The answer is an unequivocal no.
Items like dental implants are supplied in sterile packaging and are designated for single-patient use only. Attempting to reprocess them can damage the implant's precisely engineered surface, compromise its sterility, and lead to clinical failure or infection. The reusable surgical instruments in the kit, however, must undergo the full, validated sterilisation protocol before every use.
Regarding storage duration, the current standard is event-related sterility. This means a package's shelf life is determined by the quality of its storage and handling, not a fixed expiration date. As long as the package remains clean, dry, and intact, its contents are considered sterile. Store instruments in a dedicated, low-traffic area with controlled temperature and humidity. Any package that is dropped, becomes wet, or is otherwise compromised must be reprocessed immediately.
For more detailed answers on instrument handling and product specifications, you can find a wealth of information by exploring our frequently asked questions.
At Alfa Gate, we are committed to supporting clinical excellence through superior products and the educational resources to ensure their proper use. Our implant systems are engineered for reliability and long-term success, a journey that begins with uncompromising sterilisation protocols in your practice.
Explore our advanced implant solutions or contact us to discuss how Alfa Gate can support your clinic's needs and help you achieve optimal patient outcomes.
https://www.alfa-gate.us